I have previously made a couple of Naval vessels to represent those which took part in coastal or river operations during the Jacobite Rebellion. These were a 12 gun Royal Navy brig (two masted ship) and a merchant brig. These could represent HMS Hazard, captured by the Jacobites in Montrose Harbour in November 1745, and the French Armed Transport La Renommée which assisted in this. They could also represent HMS Vulture which unsuccessfully attempted to prevent a Jacobite merchant brig transporting French supplied siege artillery across the River Forth at Alloa in January 1746. Finally, the Royal Navy brig could represent the French ship “le Prince Charles” (the captured HMS Hazard) which was carrying £13,000 in gold for the Jacobites (worth £25 million today) but which was forced ashore in March 1746 in the Kyle of Tongue, by the 24 gun Frigate, HMS Sheerness.
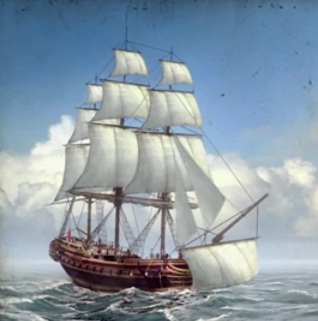
I needed a model for HMS Sheerness, a larger three masted frigate than the other two, and which looked like this.

I based my model of HMS Sheerness on a modified version of the Airfix 1:87 model of HMS Bounty, which I bought many years ago.
HMS Sheerness had 20 guns on her maindeck (10 on each side) and four smaller ones on her quarterdeck (two either side). I positioned 10 Hät Napoleonic Royal Navy guns (with Airfix French Napoleonic Artillery barrels) on the HMS Bounty maindeck to get the spacing right, making sure that I had enough room for one gunner between each gun and its neighbour.

I then used a Chinograph (wax pencil, used for map marking in my Army days) to mark the positions for the gunports on the HMS Bounty hull.

The HMS Bounty model had a totally flat deck, but I wanted my HMS Sheerness model to have a raised focsle and quarterdeck. so marked lines to cut the HMS Bounty deck to achieve this.


The original HMS Bounty cabin was very small, particularly when compared to the one on the model of HMS Hazard, which I had previously made. It also looked small compared to those on pictures of frigates, like the one at the top of this post.

To make an enlarged cabin, I used a section of curved plastic from the stand from one of the “Black Falcon” models which I had used to make both my HMS Hazard and merchant brig models.
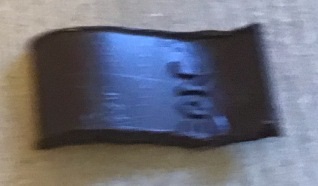
Here is the cut out section of that curved plastic. I heated the curve on the right and bent it to make it straight.
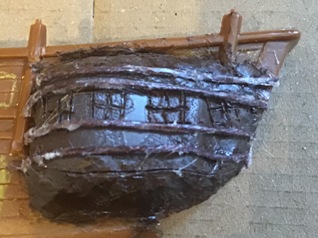
Here is the enlarged cabin. I have made some horizontal mouldings from waxed string and etched positions for the windows.
Here is the modified hull. I have cut 10 gunports where they would line up with the maindeck and two more for the quarterdeck, using my miniature soldering iron to cut these. I have removed the railings above the maindeck and cut back the hull where the quarterdeck will finish.

The four guns in the centre of the maindeck on each side will be actual gun models, but the three at the front on the maindeck will be below the focsle deck and the three at the rear of the maindeck will be below the quarterdeck.

I therefore made “hidden” guns to represent these, from a square of plastic, a drawing pin and a cut off section of Airfix Napoleonic French Artillery.

Here is a completed “hidden” gun. I made 12 of these, six for each side.
Here is one side of the hull with the hidden guns fitted.

I then cut the maindeck, using my miniature soldering iron, to create a focsle and quarterdeck. I removed all of the gratings, to give more room for my model guns and crews, then welded replacement deck in place (from sprue) and etched this to match the deck planking.

I then created bulkheads to raise the focsle and quarterdeck by using the Black Falcon bulkheads previously cut out of the merchant brig model, where I had done a reverse conversion to create a flat maindeck rather than its original raised focsle and quarterdeck. The Black Falcon model bulkheads were not as wide as the HMS Bounty model, so I extended them with spare plastic cut from the stand for the Black Falcon model.

Here is the modified maindeck.

I now glued the two sides of the hull and the maindeck together, holding it in place while it dried with rubber bands and clothes pegs.

I then cut the hull to make a waterline model, using my miniature soldering iron.

I then cut a base for the model from a sheet of plastic (purchased from Hobbycraft, my local modelling and craft store). I weighted this with heavy washers, to give the ship stability.

I then glued and welded the base onto the underside of the hull.

Because I had raised the focsle deck it now came to the top of the original model hull sides.

I had previously cut the railings off the sides of the hull, and now used these to make railings for the focsle. I also cut off the raised section which will support the bowsprit, so that this could be remounted on the modified bow.

Here is the modified focsle. I have added the railings, fitted the bowsprit support and base, added the figurehead and forepeak, added the pair of catheads (beams which support the anchors) and added balustrades (railings), the latter spare from the Black Falcon model used to make the merchant brig. The original HMS Bounty model had a large horizontal windlass occupying much of this focsle area, but I have replaced it with a smaller vertical capstan, which takes up less space, thus giving more room for my crew figures.

Here is the modified quarterdeck. I have added balustrades, created a cabin area (as I have for my other two ship models) and a piece of plastic tubing (originally a paintbrush protector) so that I can fit alternate ensigns. You can also see the rigging shroud tensioners, sticking out from the sides of the hull.

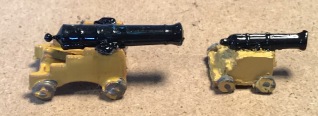
I used two sizes of guns, 8 x Hät Napoleonic Royal Navy guns (with Airfix French Napoleonic Artillery barrels, as maindeck 9 pounders and 4 x Black Falcon guns (modified with larger carriages) as quarterdeck 3 pounders.
I cut 20 gunport lids (out of the same plastic which I had used for the ship’s base) then painted these with a gloss maroon underside and gloss black topside. I am showing one row in each colour below.

I glued the maindeck guns into position then added the gunport lids to both the real gun positions and the hidden gun positions on the maindeck.


I had previously removed the gratings from the deck, in order to give more room for my guns and figures. I now modified the largest grating to make a skylight for the cabin on the quarterdeck, cutting it down the middle and making it into a roof shape, smoothing out the original gratings and creating window frames from waxed string.
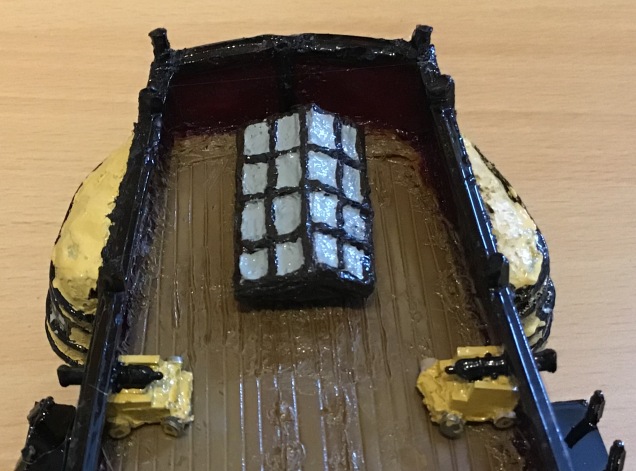
Here is the removable cabin skylight fitted onto the quarterdeck. You can also see two of the smaller 3 pounder guns on the quarterdeck. I have not fitted gunport lids to the quarterdeck guns as most illustrations do not have them (presumably because they were too high above the waterline to need them).
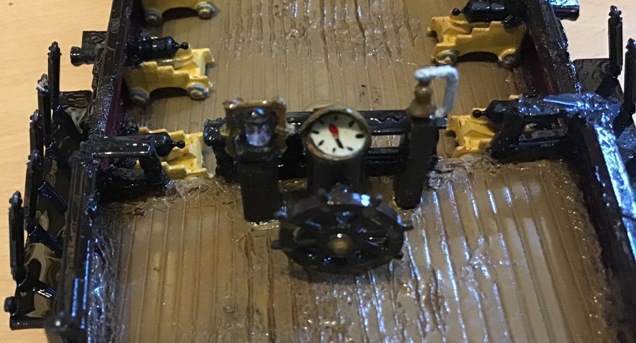
Here are the various items needed to steer the ship and mark the time. The HMS Bounty ship’s wheel originally had a frame on both sides but I have only used one to allow my helmsman figure to get close enough to the wheel to appear to be holding it. The compass binnacle is scratch built from a piece of plastic tubing, with the compass itself from a plug used to cover screw holes on flat pack furniture (I had previously used these to make Jacobite targes). The binnacle has a hood to protect it in bad weather, modelled from a piece of plastic packing from a toothbrush. The bell is straight from the HMS Bounty model, but I have moved it from the maindeck to the quarterdeck. The sandtimer (used to measure time in 30 minute “bells”) is scratch built using two glass beads.

Here are all of those instruments in position on the quarterdeck.
Here is the painted figurehead and forepeak.


I will pause here and post Part 2 later, to include masts, bowsprit, rigging, sails, anchors, ensign, jollyboat and ship’s crew.
[to be continued]

What a great project Rod. Looking forward to seeing the finished article. Always brings a smile to my eye when Airfix gets another lease of life instead of mouldering away in an box in an attic.
LikeLike
Hi Simon,
I think I bought that Airfix HMS Bounty model about 15 years ago, so it was good to finally use it.
Rod
LikeLike
What a lot of work. But I know you strife for perfection. Looking forward to the other half of the story.
LikeLike
Hi Peter,
Yes, it has taken a long time, but it is enjoyable. I probably do about two hours a day, in the early morning, on my wargaming projects.
Rod
LikeLike
A brilliant job. Well done. For those of us without a back supply of convenient Airfix models to hand try searching for kiddies Pirate Ships on Amazon or the like. These are of varied scales but the right ones can be selected as good, cheap, starting points and will require only the same amount of modelling as Rod has detailed.
LikeLike
Hi,
Yes, I often buy out of production items on eBay as well.
Rod
LikeLike
Excellent work modding that kit.
Really like how it is looking.
Cheers,
Pete.
LikeLike
Hi Pete,
It was good fun doing it, including quite a lot of time spent working out how to modify it and testing that my planned modifications worked (ie that there was room for guns and crew).
Rod
LikeLike