I decided to model the Battle of Clifton (or as some would call it the Skirmish of Clifton). To set the scene, I will start with some slides from my PowerPoint talk on “The 45” which should be finished later this year, and I will give to raise funds for the British Military Charity “Combat Stress”.
In November 1745 the Jacobites marched into England, down the West coast through Carlisle and moving too fast to be caught by Wade’s Northern Army on the East coast. Their intention was to head for London and they expected English Jacobites to join them. A few did in Manchester, but in insignificant numbers. Cumberland’s Midlands Army was positioned to block them just North of Coventry, but Lord George Murray took some of his force on a diversionary move towards Wales, where there was some Jacobite support. Cumberland marched towards Wales, but Murray swung back to rejoin the main Jacobite Army.

The Jacobite Army had arrived at Derby on 4th December, but with no significant support from English Jacobites the decision was taken to return to Scotland and they began their march back on 6th December. Cumberland, realised that the Jacobite Army had slipped by him and completely “wrong-footed” marched south to Coventry to try to block them there. By the time he realised his mistake the Jacobite Army was several days march ahead of him. He however formed a force to pursue them, led by him personally, comprising six Cavalry Regiments and some Infantry mounted on local horses.
Meanwhile Wade again marched South, but realised his slow moving Army could not intercept the Jacobites. He decided to send Oglethorpe’s Cavalry Brigade from Doncaster to Preston, over the Pennines, to try to catch up with the fast moving Jacobite Army.

The Jacobites marched North from Kendal in appalling winter conditions. When they arrived at Shap they abandoned their four wheel wagons, transferred their supplies to smaller two wheel carts and pressed on towards Clifton.
Meanwhile Oglethorpe had joined with Cumberland at Kendal. Cumberland sent Oglethorpe on a flank march to intercept the Jacobites at Shap, but Oglethorpe turned back at Orton in the severe weather. Cumberland was furious at Oglethorpe for this missed opportunity. Their forces met up at Shap and they continued to pursue the retreating Jacobites.
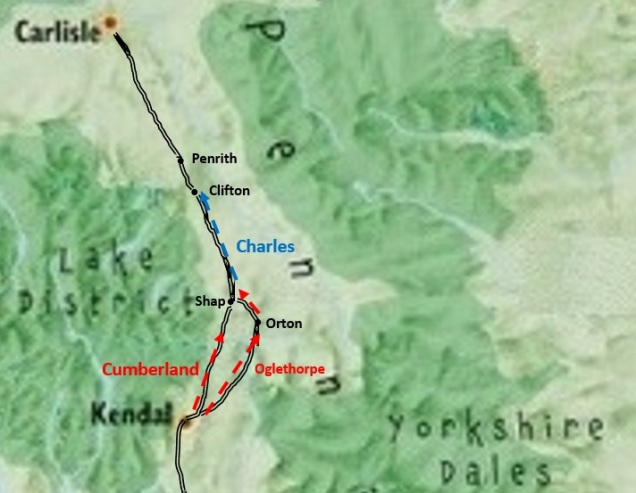
Cumberland finally caught up with the Jacobite rearguard at Clifton on 18th December 1745 and a plan of the battle at its climax is below. Oglethorpe’s Brigade was sent out to the right to try to swing around behind the Jacobite rearguard, but failed to do so, again incurring Cumberland’s anger. The rest of the battle I will cover with my models.

I only have a small 4 foot x 2 ½ foot (120 cm x 75 cm) semi-permanent wargames table set up in my study. I say semi-permanent since the legs do fold on the table, but it is normally left up. I therefore did not cover the unsuccessful flank march of Oglethorpe’s Brigade.
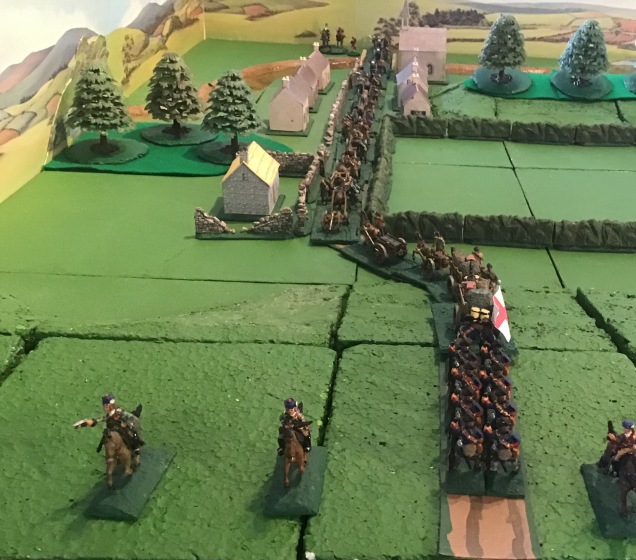
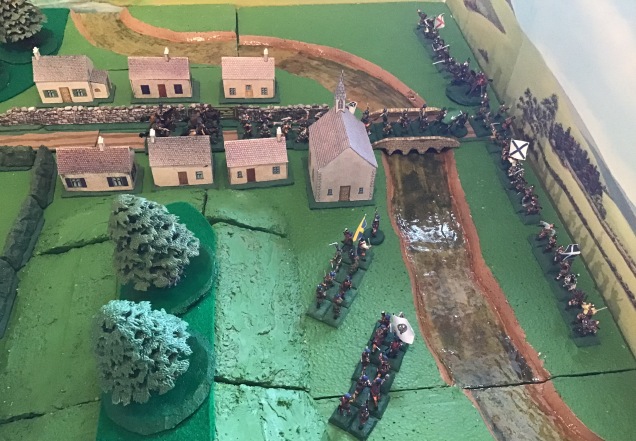
My representation of Clifton, viewed from East to West, looks like this. The fields and hills are my own modular system as described here. The houses and church are all PaperTerrain (original or modified) whilst the trees and hedges are Merit. The roads and bridge are scratch built as described here. The backgrounds are Peco model railway scenery.

Brackenber Hill is on the left, a hedged enclosure is in the front centre. Just to the West of that is Town End Farm Cottage. To the right (North) of the hedged enclosure is Scalebarr’s Hill, with Clifton village to the West of that. The bridge over the River Lowther was really much further North of the village.
My description below, is a simulation of what happened, rather than a wargame as such. I have mainly followed the descriptions in Christopher Duffy’s “Fight for a Throne” and Stuart Reid’s “1745 – A Military History of the Last Jacobite Rising”, but have used Gavin Wood’s trilogy on the Jacobite Grenadiers for their movements (although a novel, this is based on the letters of Captain Patrick Lindsay of Kilmarnock’s Horse Grenadiers).
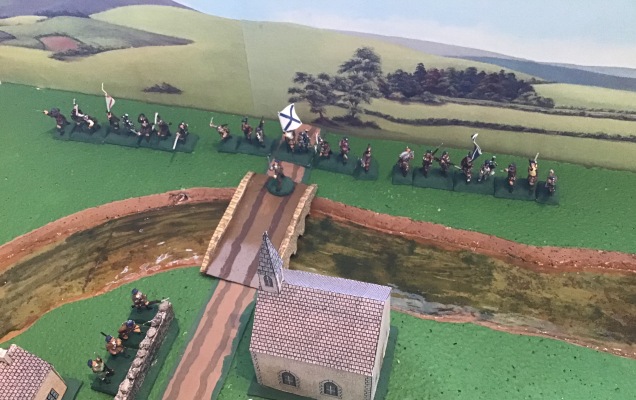
The main Jacobite Army had already crossed the Lowther Bridge and was heading on to Penrith. Below you can see a view looking North of the last units of the retreating Jacobites, which were their Artillery and Baggage Train. The rearguard is the Manchester Regiment with a composite Cavalry Squadron of Kilmarnock’s Horse Grenadiers and Strathallan’s Horse.
At the Lowther Bridge, Lord George Murray and his ADC, Colonel Ker, are joined by Colonel Grante, the Jacobite Artillery commander. The battery of French supplied “Swedish” 4 pounders (represented by 3 model guns) are crossing the bridge, led by their Jacobite gunners and one French artilleryman.

These are followed by two batteries of artillery captured at Prestonpans (represented by 3 x 1 ½ Pounder Curricle Guns, 1 x Royal Mortar and 2 x Coehorn Mortars), each battery preceded by their six gunners (again five Jacobite and one French). The last gun in this view is the ancient 3 Pounder Falcon brought from Blair Castle.

Finally, coming down Brackenber Hill are two ammunition wagons and two baggage wagons, followed by the Manchester Regiment.

The Jacobite Rearguard Cavalry could see the Advance Guard of Cumberland’s Cavalry moving towards them. Lord George Murray therefore sent some reinforcements back from Penrith to Clifton. Bagot’s Hussars dismounted and took up a position at Town End Farm Cottage. Pitsligo’s Horse was also sent back, and I have assumed accompanied Bagot’s Hussars, forming a composite Squadron with them. Three units lined the stone walls through Clifton village, from left to right MacDonnells of Glengarry, Roy Stuart’s Edinburgh Regiment and two companies of The Duke of Perth’s Regiment. I have assumed this Brigade was commanded by Colonel Roy Stuart, who was certainly at the Battle. On the model below, the 1 ½ Pounder Curricle guns captured at Prestonpans are now crossing the Lowther Bridge.

Cumberland’s Advance Guard now arrived on the crest of Brackenber Hill. This comprised Kingston’s 10th Light Horse, with out in front a composite squadron of three Georgia Rangers (on the right) and two of the Duke of Cumberland’s Hussars (normally his personal escort, but here taking a more active role). I have assumed that the commander of this Advance Guard is Lieutenant Colonel Mourdant of Kington’s Light Horse.
The Jacobite rearguard composite Cavalry Squadron (Kilmarnock’s Horse Grenadiers and Strathallan’s Horse) withdraw to the woods behind Town End Farm Cottage. The Mortar Battery captured at Prestonpans is now crossing the Lowther Bridge.

Lord George Murray sent back more reinforcements to Clifton. There are the Stewart of Appin Regiment and MacPherson of Cluny’s Regiment. They lined the crest of Scalebarr’s Hill. I have assumed this Brigade was commanded by MacPherson of Cluny, who was recorded as being at the battle. I have shown Lord George Murray and his ADC moving up to the Western end of that hill. The Jacobite Ammunition and Baggage Train is now crossing the Lowther Bridge.

Cumberland’s Advance Guard charges the dismounted Jacobite Cavalry at Town End Farm Cottage. Meanwhile Kilmarnock’s Horse Grenadiers and Strathallan’s Horse have dismounted and taken up a position on the front of the wood to the West of cottage.

The outnumbered Bagot’s Hussars and Pitsligo’s Horse flee away from Town End Farm Cottage. Cumberland’s Advance Guard took a few prisoners, but then rejoined their main force which was now arriving. The Manchester Regiment are crossing the Lowther Bridge.

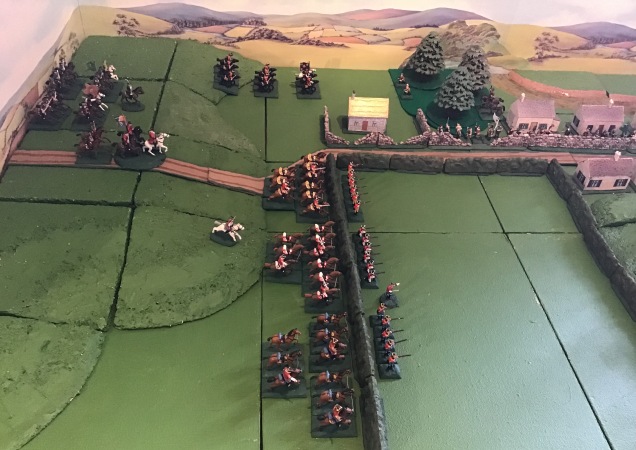
Cumberland’s main force arrives on Brackenber Hill. From the left (as you view it) is Bland’s 3rd Dragoons, Kerr’s 11th Dragoons and Cobham’s 10th Dragoons. Major General Bland is on a grey horse leading them. The Duke of Cumberland is in the centre (on the road), with his Hussar escort having rejoined him. Immediately to his right (as you view it) is Montague’s 9th Light Horse and Kingston’s 10th Light Horse, commanded by Lieutenant Colonel Mourdant of Kington’s Light Horse. On the extreme right of the picture are Ligonier’s 8th Horse. I have not shown the mounted infantry who were in reserve and the Georgia Rangers have rejoined Oglethorpe’s Brigade.

The Manchester Regiment had crossed the Lowther Bridge and marched on towards Penrith. Lord George Murray now deployed his Atholl Brigade, under the command of Lord Nairne, to the North of that bridge.
The 3rd, 11th and 10th Dragoons advanced to the enclosures and dismounted. Over on the extreme West the 8th Horse advanced towards the woods.
As the 8th Horse advanced they came under fire from the dismounted Jacobite Cavalry in the woods. They were not sure of the Jacobite strength and their attack stalled. Being Horse rather than Dragoons, they did not dismount to fight on foot.

As the three British Dragoon Regiments advanced across the field, led by Lieutenant Colonel Honeywood of the 3rd Dragoons (also on foot), the Stewarts of Appin and MacPhersons of Cluny Regiments advanced to the hedges at the foot of Scalebarr’s Hill and opened fire. Simultaneously the MacDonnell of Glengarry Regiment lined the hedges to the West of the advancing Dragoons and fired on their flank.

The Jacobites now charged the Dragoons both to their front and their left flank.
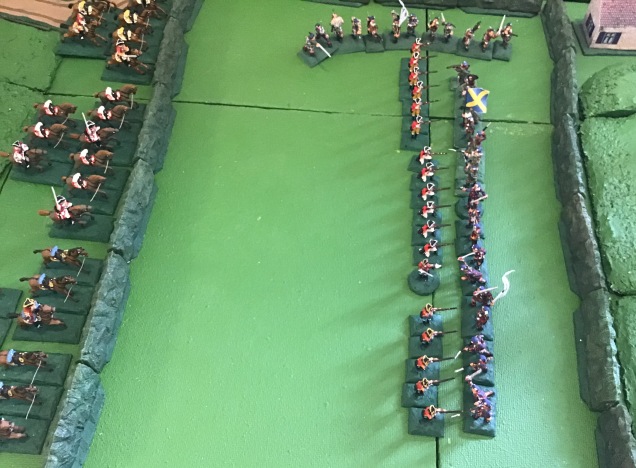
The Dragoons broke and fled back across the field, pursued by the Jacobites.

The Dragoon retreat carried them up onto Brackenber Hill.

The victorious Jacobites withdrew in good order over the Lowther Bridge and on towards Penrith and Carlisle.
Cumberland’s defeated Cavalry Force was not fit to march on until 20th December, so the Jacobites gained two days on them.

Amazing!
LikeLike
Hi Frank,
Glad you liked it.
Rod
LikeLike
Excellent portrayal of the battle , sadly there has been a new estate of houses built on what was the Jacobite left . I’ve walked the old road from Shap to Kendal several times , interesting as it doesn’t follow the route of the modern turnpike built in the 1750’s . Yes Shap Fell can be very bleak – I know because I used to work on that stretch of road doing highway maintenance .
LikeLike
Hi Tony,
Glad you liked it.
Rod
LikeLike
A very readable and informative report.
I like your “Old School” style of gaming and am in awe of your skill at converting soft plastic soldiers.
LikeLiked by 1 person
Hi,
I have been converting soft plastic figures for nearly 60 years, so a lot of experience (plus trial and error) there.
Rod
LikeLiked by 1 person
Hugely impressed with this post – a wonderful way to explain the battle!
Cheers
Marvin
LikeLike
Hi Marvin,
Yes, I found that I understood the battle more as I modelled it.
Rod
LikeLiked by 1 person
Yes, I find that my modelling often usefully informs my historical research and vice versa.
LikeLike